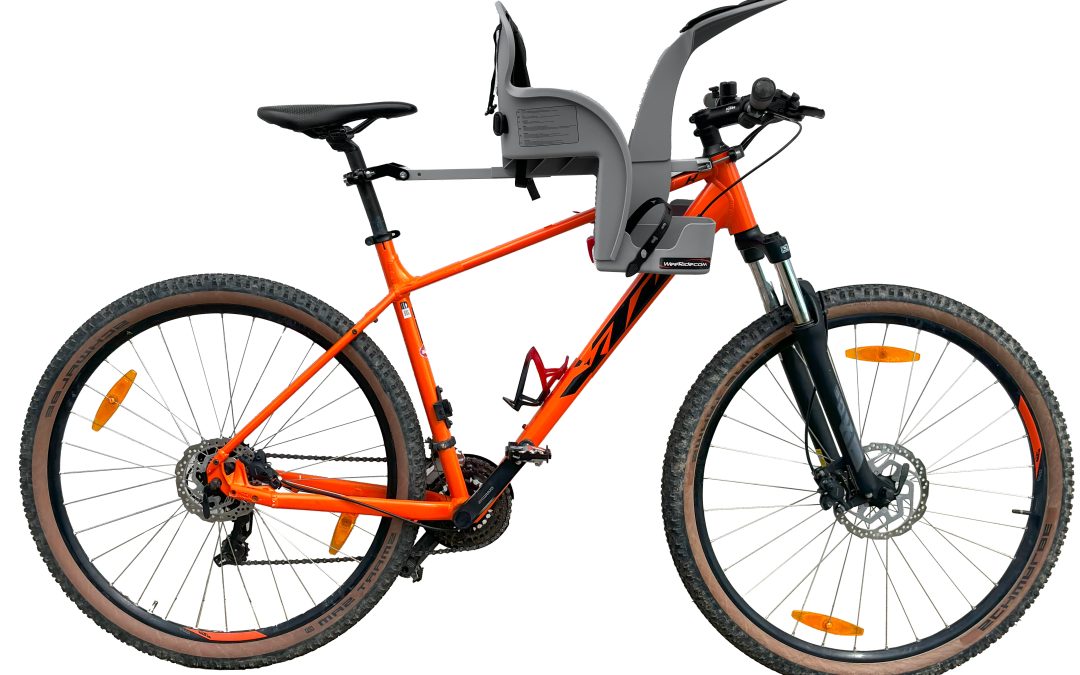
Learning how to fit a front-mounted child bike seat is simpler than most parents expect. With a centre-mounted seat like our WeeRide Safe Front, the whole process takes about 15 minutes with basic tools. Once the mounting bar is in place, the seat clicks on and off in seconds for everyday use.
A quick note on terminology: Throughout this guide, we use "front mounted" as it's the most common search term — but our WeeRide seats actually mount to the centre of your bike (between you and the handlebars), not on the handlebars themselves. This centre-mounted design is safer and more stable than true front-handlebar seats. For a full comparison of mounting positions, see our guide to front vs rear child bike seats.
Quick overview: you'll attach a mounting bar between your headtube and seatpost, slide the seat onto the bar, and adjust the position for comfort. No drilling, no permanent modifications to your bike, and you can remove everything if you need to.
Here's the step-by-step process, plus tips for getting the fit right first time.
What You'll Need
Before you start, gather these items:
Included in the box:
Your WeeRide seat, mounting bar, clamp fittings (headtube and seatpost), Allen key bolts, and the instruction manual.
You'll need:
A set of Allen keys (hex keys) — typically 4mm and 5mm. A Phillips screwdriver may be needed for some clamp styles. That's it. No specialist bike tools required.
Optional but helpful:
A bike stand or someone to hold the bike steady while you work. A tape measure for checking clearances. The WeeRide fitting guide PDF open on your phone for reference.
Fitting Your Front-Mounted Bike Seat: Step by Step
Watch our step-by-step installation guide:
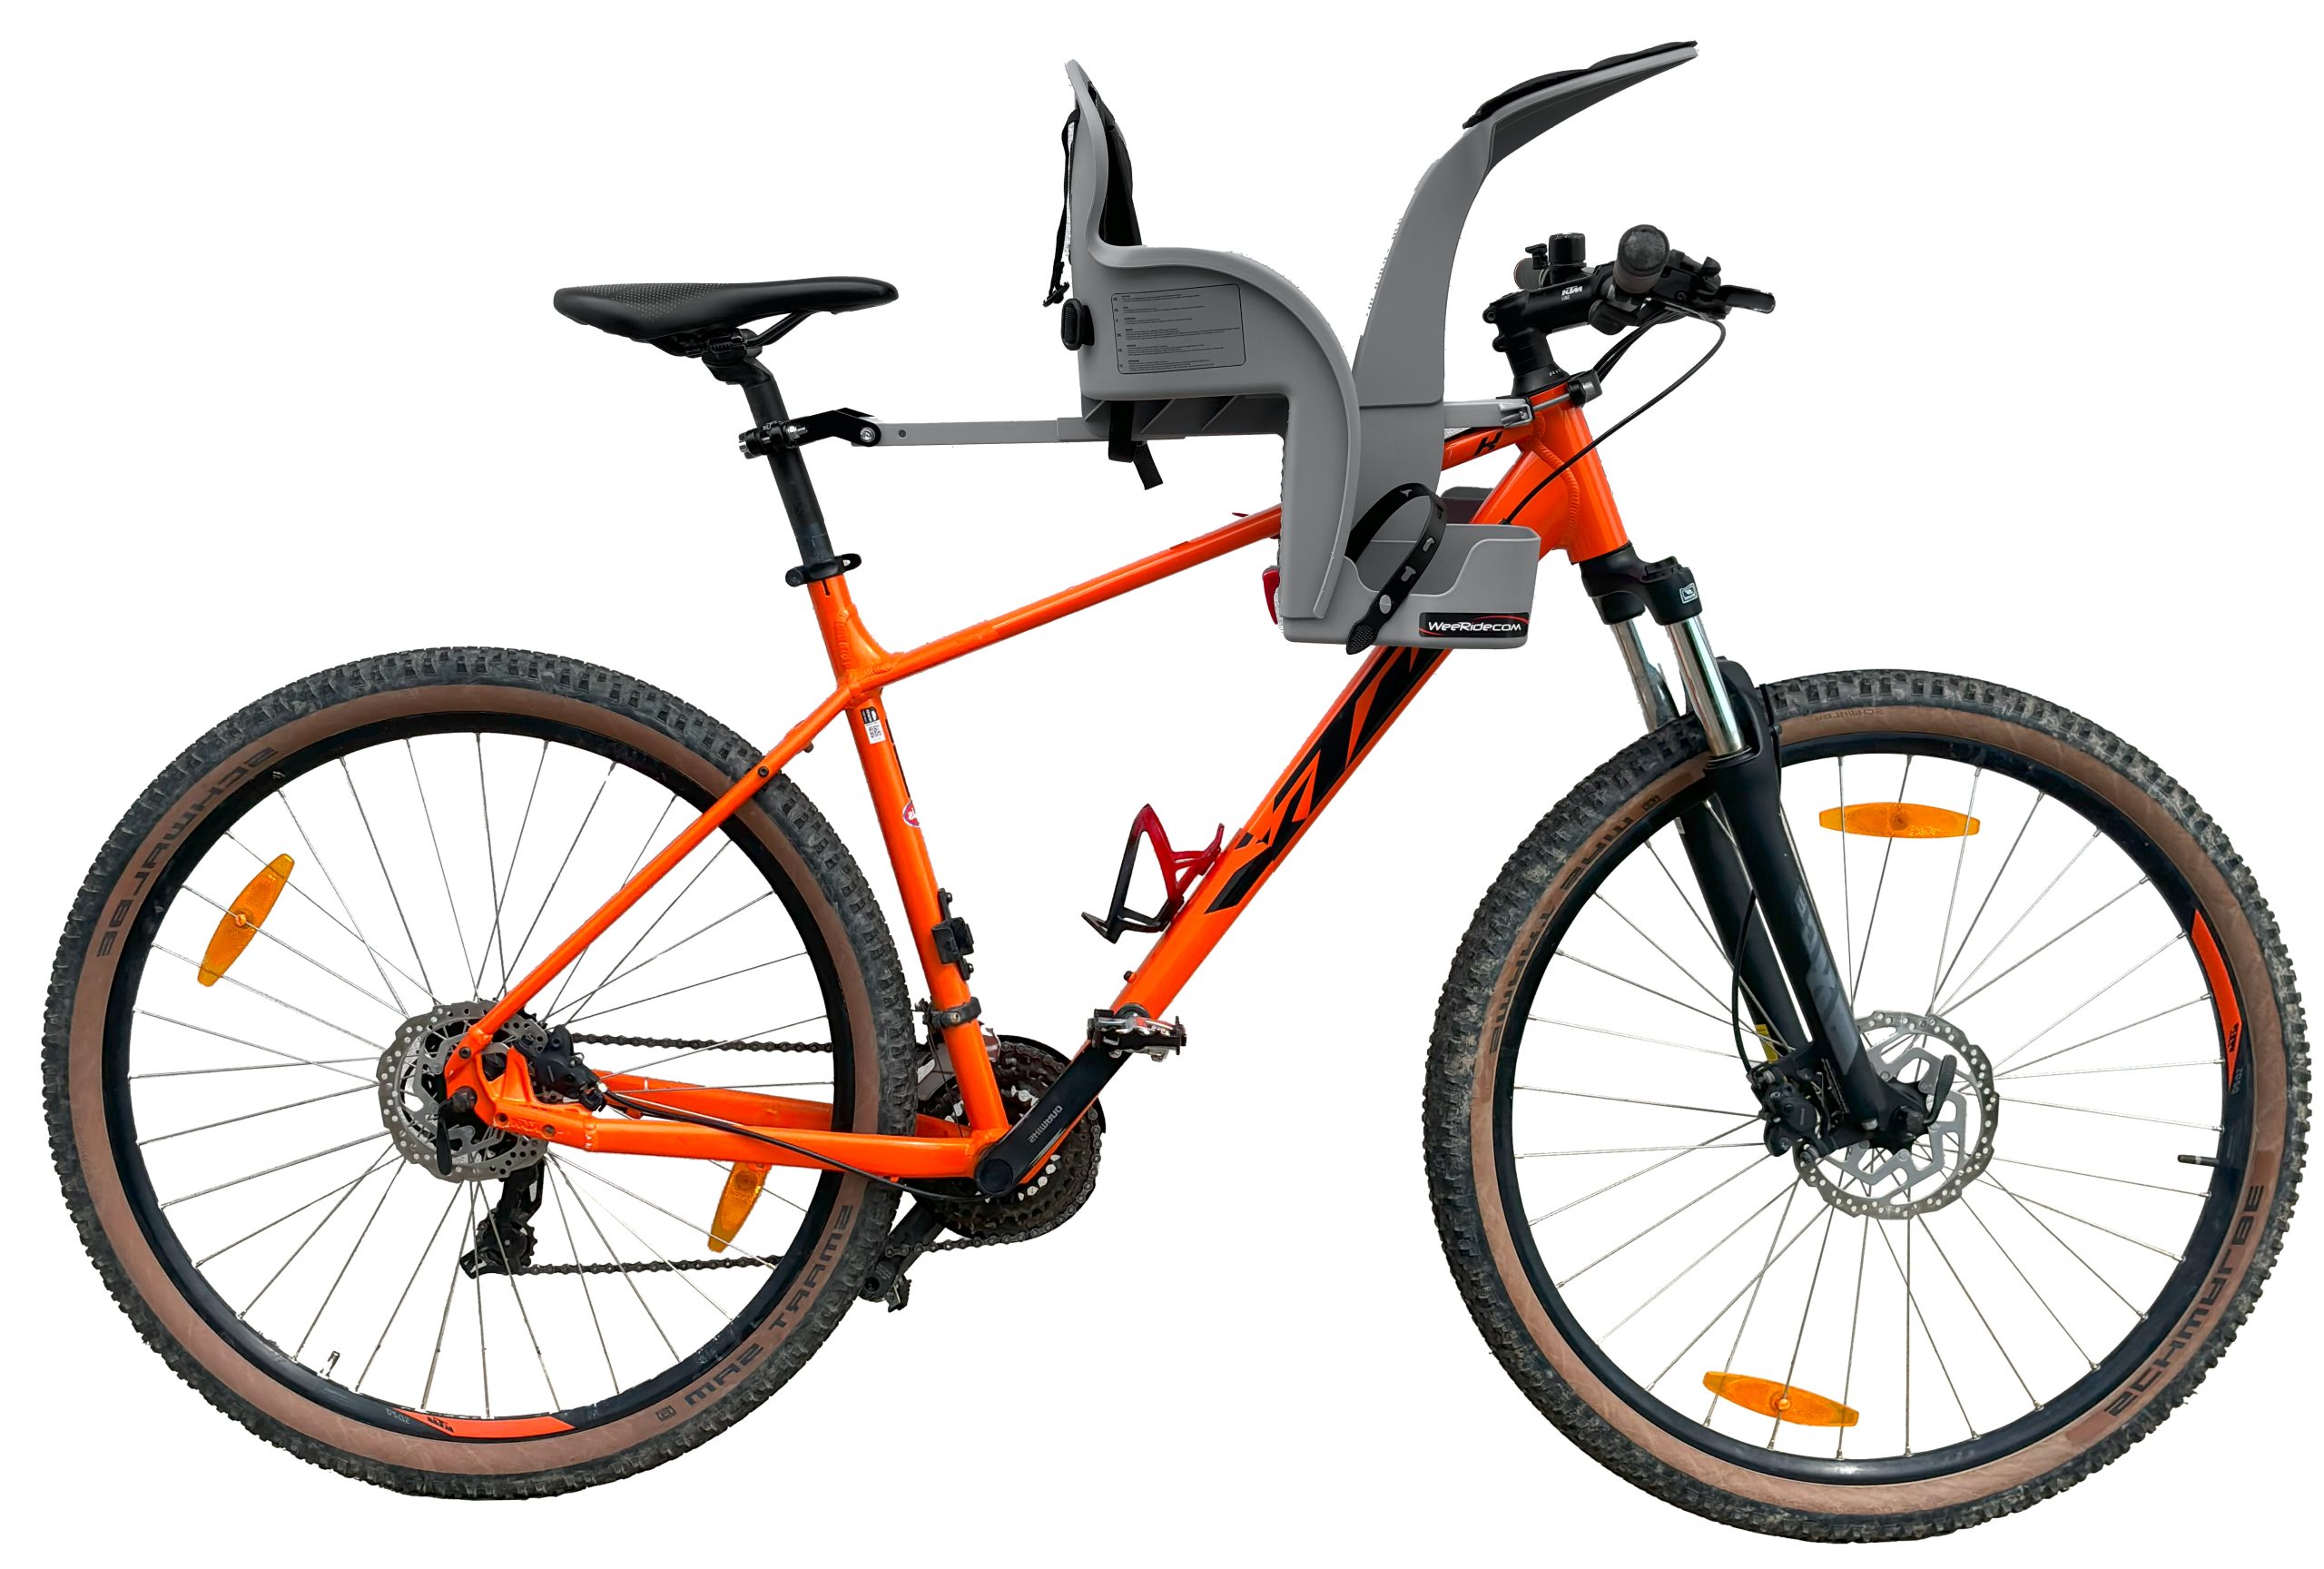
Step 1: Attach the Mounting Bar to the Headtube
The front clamp attaches to the headtube (the tube at the front of your bike where the handlebars connect to the frame). Place the clamp around the headtube and align it so the mounting bar will run straight back towards the saddle. Tighten the Allen bolts evenly, alternating between sides to keep the clamp centred. Don't fully tighten yet — you'll want to adjust the angle once the full bar is in place.
Tip: if your headtube has less than 40mm of exposed tube (common on bikes with long stems), you may need the WeeRide Universal Stem Adaptor. This replaces one of your headset spacers to create a mounting point. It's a common solution for bikes with minimal headtube clearance.
Step 2: Attach the Mounting Bar to the Seatpost
The rear of the mounting bar clamps around your seatpost. Loosen your seatpost collar slightly, slide the mounting bar clamp around the seatpost, and re-tighten. The bar should sit roughly horizontal between the headtube and seatpost. If it tilts noticeably, adjust the clamp positions until the bar is level.
Check the bar doesn't interfere with cables. Route brake and gear cables around the bar if needed. The bar should sit alongside cables, not pinching or bending them.
Step 3: Slide the Seat Onto the Mounting Bar
With the mounting bar secured, slide the seat onto the bar from above. The seat has a channel on the underside that fits over the bar. Position it between the handlebars and your saddle, leaving enough room for your legs to pedal comfortably.
Tighten the hand-screw underneath the seat to lock it in position. This is a tool-free adjustment, so you can slide the seat forward or back to fine-tune the fit whenever you need to.
Step 4: Final Checks and Adjustments
Tighten all bolts fully. Go back to the headtube clamp and seatpost clamp and tighten them firmly. The bar should not rotate or slide when you push on it.
Check pedalling clearance. Sit on the bike and pedal slowly. Your knees should clear the back of the seat at the top of the pedal stroke. If they catch, slide the seat slightly forward.
Test the harness. With the seat empty, buckle and adjust the harness. Make sure the straps pull snug and the buckle clicks securely. You should be able to slide one finger between the strap and where your child's chest will be.
Rock the bike gently. With the seat in place, tilt the bike side to side. The seat should feel solid with no wobble, rattle, or movement. If anything shifts, re-tighten the bolts.
Will It Fit My Bike?
Our WeeRide Sûr Avant fits 99% of adult bikes, including mountain bikes, hybrids, road bikes, city bikes, and electric bikes. The crossbar mounting system works with virtually any frame shape because it creates its own top tube between the headtube and seatpost.
The rare exceptions are bikes with extremely short headtubes (under 40mm exposed) without enough room for the clamp. In these cases, the Universal Stem Adaptor solves the problem. Step-through frames, curved top tubes, and e-bikes with downtube batteries all work without issues.
Never fit a child seat to a carbon fibre frame. The clamping pressure can damage carbon tubes. This applies to all child seats, not just centre-mounted ones.
Tips and Common Mistakes
Don't over-tighten the clamps. Firm is good. Forcing the bolts beyond snug can crack alloy fittings or damage your frame's paint. If the bar moves at firm tightness, check the clamp is the right size for your tubes rather than adding more torque.
Re-check after the first ride. Bolts can settle slightly during the first ride as everything beds in. After your first outing, give every bolt a quick check and re-tighten if needed.
Remove the seat when not in use. The mounting bar can stay on your bike permanently, but the seat slides off in seconds. Removing it when you're riding solo makes the bike feel normal again and keeps the seat clean.
Don't forget the footrests. Adjust the footrests to match your child's leg length. Feet should rest flat, not dangle. Dangling feet are a safety risk near the front wheel.
Frequently Asked Questions
How long does it take to fit a front-mounted child bike seat?
About 15 minutes for the initial installation of the mounting bar and seat. After that, the seat slides on and off the bar in under 30 seconds.
Do I need to take my bike to a shop for fitting?
No. The WeeRide Safe Front is designed for home fitting with basic Allen keys. If you're not confident, bike shops can fit it for you, but most parents manage it easily with the included instructions.
Can I move the seat between bikes?
Yes. You can buy an additional mounting bar for a second bike. Fit a bar to each bike, and the seat slides from one to the other in seconds. This is ideal if both parents want to ride with the child.
Will fitting the seat damage my bike?
No. The clamps grip the headtube and seatpost without drilling or permanent modification. When you remove the mounting bar, your bike returns to its original state. Just avoid carbon fibre frames, where clamping pressure can cause damage.
Get Fitted and Get Riding
Now you know how to fit a front-mounted child bike seat, the only thing left is to do it. Fifteen minutes of setup opens up months (or years) of family cycling together. Once the mounting bar is in place, getting your child in and out takes less time than buckling a car seat.
Browse our full range of child bike seats or download the official fitting guide if you'd like the manufacturer's step-by-step instructions for your specific model.